Planning Your First Solo Backpacking Trip: A Step-by-Step Guide
Start your first solo backpacking trip by selecting Level 1 beginner trails with 4-8 miles daily and maximum 800 feet elevation gain. Build physical endurance through five weekly training sessions with load-bearing exercises at 80% of your expected pack weight. Choose gear across five core categories: backpacks (30-50 liters), shelter, cooking equipment, clothing, and accessories, keeping total weight under 20% of your body weight. Download offline maps, share detailed itineraries with emergency contacts, and pack a satellite messenger for areas without cellular coverage. Following these systematic preparation steps will open up the thorough strategies needed for a successful wilderness adventure.
We are supported by our audience. When you purchase through links on our site, we may earn an affiliate commission, at no extra cost for you. Learn more. Last update on 7th January 2026 / Images from Amazon Product Advertising API.
Notable Insights
- Start with beginner-friendly trails (4-8 miles daily, under 800 feet elevation gain) and build physical conditioning through regular cardiovascular and strength training.
- Create a detailed trip plan including route, permits, weather forecasts, and share your complete itinerary with emergency contacts before departing.
- Test all gear beforehand, keep total pack weight under 20% of body weight, and prioritize lightweight, multi-functional equipment.
- Carry essential safety equipment including satellite messenger, backup batteries, first aid kit, and learn basic navigation skills with map and compass.
- Follow Leave No Trace principles by packing out all waste, camping in designated areas, and storing food in bear-proof containers.
Selecting the Perfect Trail for Your Abilities and Experience Level
Your first solo backpacking trip‘s success hinges on selecting a trail that matches your current fitness level and hiking experience.
Trail selection requires honest skill assessment of your physical capabilities and technical knowledge.
Begin with Level 1 beginner trails featuring 4-8 miles daily distance and maximum 800 feet elevation gain.
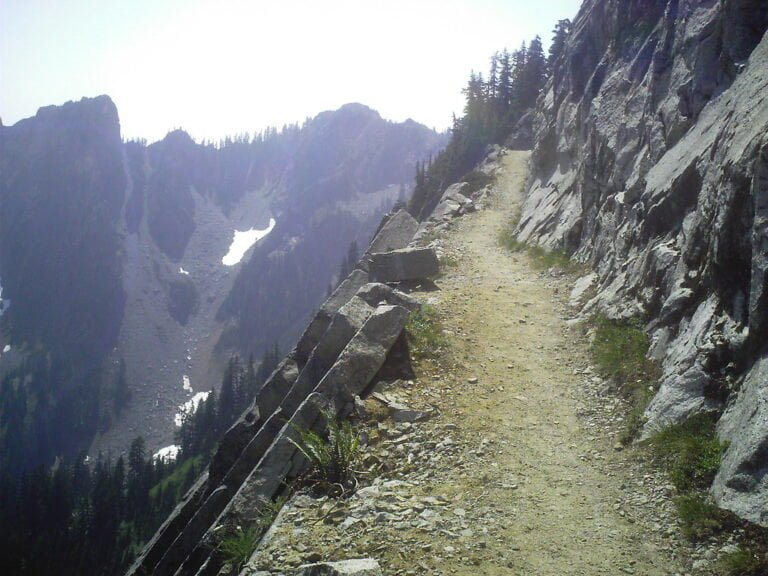
These routes offer well-marked paths with minimal navigation challenges and even terrain.
Well-marked beginner trails provide clear pathways with straightforward terrain and minimal navigation complexity for first-time solo backpackers.
You should comfortably carry 25-35 pounds while maintaining 2-3 mph hiking pace.
Evaluate your cardio endurance against backpacking benchmarks: jogging 2-5 miles or biking regularly indicates adequate fitness preparation.
Prior day-hiking experience with loaded packs provides essential baseline skills.
For optimal carrying convenience, ensure your loaded backpack’s weight represents 10-15% of your body weight as a beginner to prevent injury and maintain comfort throughout your journey.
Avoid Level 2+ moderate trails exceeding 1,300 feet daily elevation gain or requiring off-trail navigation.
Advanced routes demand technical skills you haven’t developed yet. These challenging trails feature unmarked paths that require advanced navigation abilities and route-finding experience beyond beginner capabilities. Once you’ve gained experience, you can progress to moderate trails that require carrying 35-42 pounds over 6-10 miles daily.
Essential Pre-Trip Planning and Research
Before stepping onto the trail, thorough pre-trip planning transforms potential disasters into manageable challenges through systematic preparation and documentation.
Document your complete itinerary including trailhead location, planned campsites, and exact start/end dates. Include vehicle details like make, model, color, license plate, and parking coordinates for emergency reference. Leave this information with trusted contacts along with local authority numbers for search and rescue teams.
Download offline maps using GPS navigation apps that provide elevation profiles and trail conditions data. Research current weather forecasts for your hiking dates to anticipate gear needs. Secure all required permits and passes in advance while reviewing local regulations for camping restrictions and campfire rules.
Plan meals systematically and research water sources along your route. Prepare first aid kits and set vacation messages before departure. Verify that all medications haven’t expired to ensure they remain effective throughout your trip. Choose familiar, well-traveled trails close to home for your first solo adventure to build confidence in a more predictable environment.
Select gear that balances weight and functionality, including synthetic insulation sleeping bags that retain warmth even when wet and perform reliably for budget-conscious backpackers.
Creating a Comprehensive Safety and Communication Plan
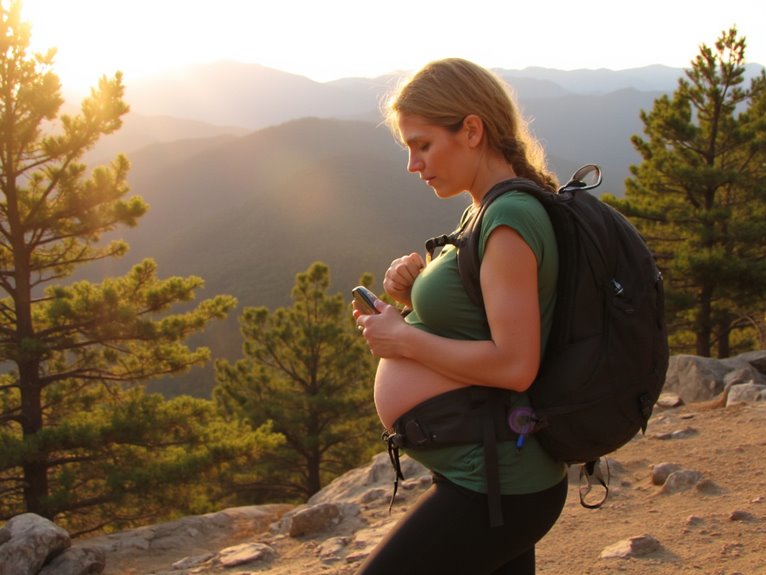
Solo backpacking amplifies every risk on the trail, making a well-structured safety and communication plan your most important piece of gear. Your safety equipment must include a fully charged satellite messenger like the Garmin inReach Mini 2, which provides two-way messaging and SOS capabilities in areas without cellular coverage.
Pack backup battery packs rated for at least 10,000mAh capacity to extend device operating time beyond the standard 50-hour battery life.
Establish thorough communication strategies with your emergency contact. Share detailed itineraries including GPS coordinates, planned campsites, and specific check-in times. Choose familiar trails for your first solo trips to reduce anxiety and increase confidence on the trail.
Download offline maps through apps like Gaia GPS before departure. Your first aid kit should contain wound care supplies, medications, and emergency shelter components. Include a signal mirror in your emergency kit as it can be spotted from great distances by search and rescue teams when you need to attract attention.
Test all devices before leaving to confirm subscription status and signal functionality. Pack a reliable water purification system weighing under 16 ounces to ensure safe hydration throughout your solo journey without depending on potentially contaminated natural water sources.
Building Physical Endurance and Mental Confidence
While technical gear and route planning form the foundation of solo backpacking preparation, physical conditioning and mental readiness determine whether you’ll actually enjoy the experience or merely survive it.
Strength training builds the muscular endurance needed for sustained performance under load. Your conditioning program should target four key areas:
Muscular endurance through targeted strength training separates confident solo backpackers from those who struggle under pack weight on challenging terrain.
- Load-bearing exercises – Practice weighted backpack training with 80% of your expected pack weight.
- Functional movements – Include step-ups and hip roll exercises that simulate trail conditions.
- Cardiovascular conditioning – Maintain five training days weekly with interval training and cross-training.
- Core stability work – Develop static and dynamic balance for uneven terrain navigation.
Mental visualization techniques prepare you psychologically for trail challenges. Practice imagining difficult scenarios and successful outcomes during training sessions. Incorporate active recovery strategies including foam rolling and stretching into your daily routine to enhance joint flexibility and prevent injuries. Quality footwear paired with merino wool socks provides essential moisture-wicking and blister prevention during extended hiking sessions. Begin this comprehensive training regimen 8 weeks prior to your planned departure date to allow adequate time for physical adaptation and skill development.
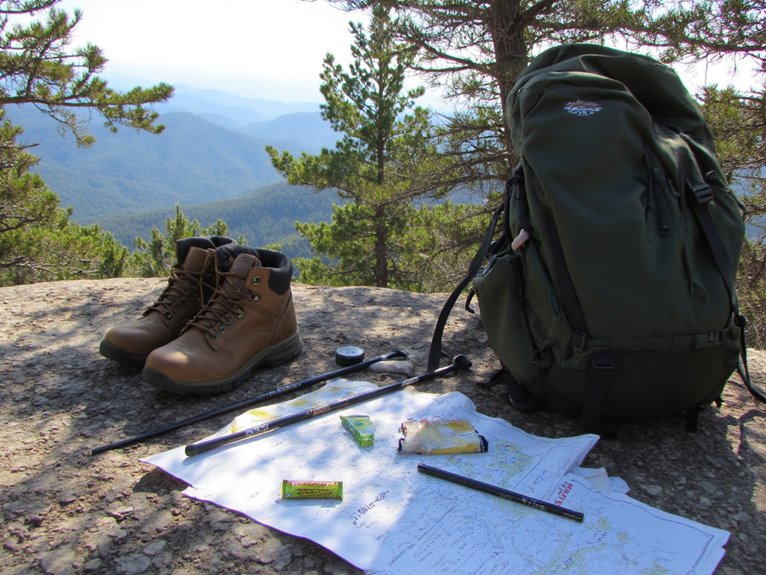
Choosing and Testing Your Backpacking Gear
Your gear selection directly impacts your safety, comfort, and success on solo backpacking trips.
You’ll need to choose equipment that balances weight, durability, and functionality across five core categories: backpacks, shelter systems, cooking gear, clothing, and accessories.
Testing every piece of equipment before your departure eliminates surprises and builds confidence in your gear’s performance when you’re miles from civilization. A minimalist approach to clothing selection helps reduce pack weight while maintaining essential protection and comfort on the trail.
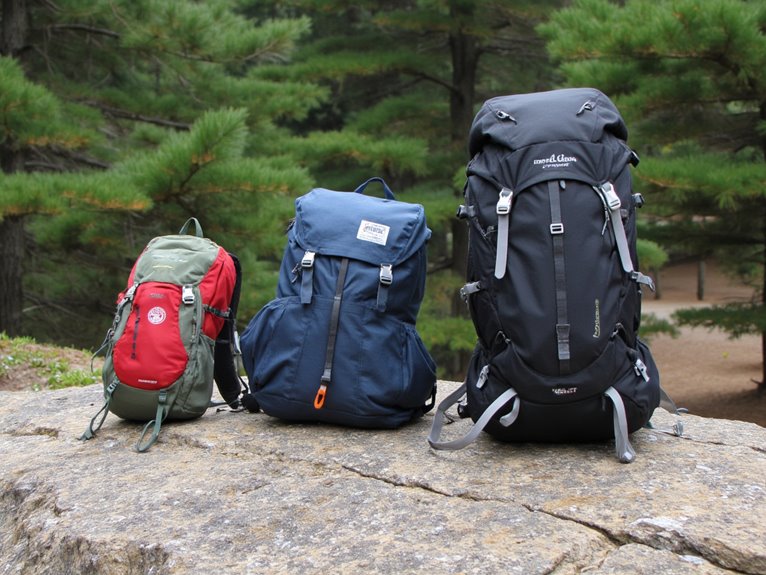
For overnight trips, select a backpack in the 30-50 liter range to accommodate your essential gear without unnecessary bulk. Look for packs constructed with ripstop nylon materials and quality zippers to ensure your gear stays secure and dry throughout your journey.
Essential Gear Selection
Before you can tackle the wilderness confidently, you’ll need to carefully select and test every piece of gear that goes into your pack.
Essential backpack features include 50-80 liter capacity, adjustable harness systems, and waterproof protection. Your shelter options range from ultralight tents under 4-5 pounds to tarps and hammocks.
Critical gear categories require specific attention:
- Hydration systems – Water filters, bottles, and backup purification tablets guarantee safe drinking water.
- Sleep system – Sleeping bags rated to 20 degrees, insulated pads, and lightweight shelters.
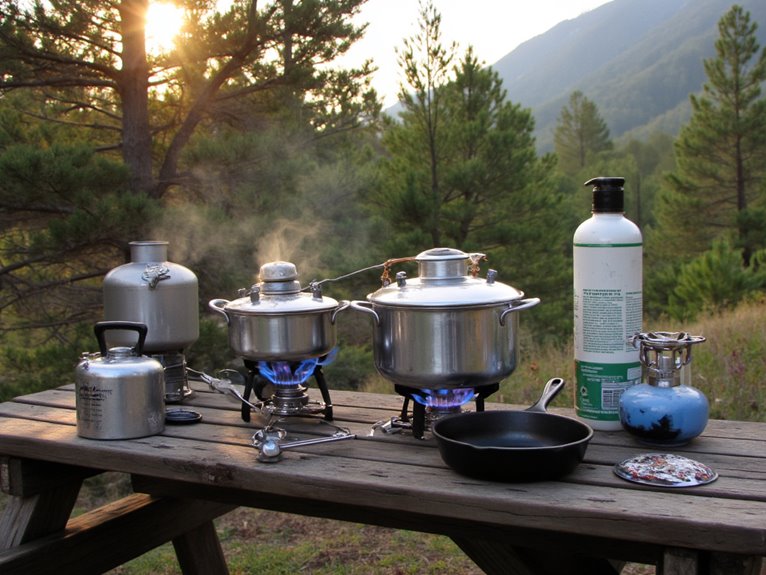
- Cooking equipment – Canister stoves, fuel, lightweight pots, and wildlife-proof food storage.
- Clothing layers – Moisture-wicking base layers, insulating midlayers, waterproof shells, and terrain-appropriate footwear.
For maximum efficiency on solo trips, prioritize ultralight sleeping bags under 2 pounds with down insulation and compression sacks that reduce packed size to water bottle dimensions.
Test everything extensively before departure.
Pre-Trip Equipment Testing
Gathering your gear marks only the beginning of proper preparation-every piece of equipment requires rigorous testing before you step foot on the trail.
Field testing should occur over multiple weekend trips, not single-day hikes. Load your backpack with the exact weight you’ll carry solo. Walk for hours to identify pressure points and chafing. Test every gear combination in real conditions-rain, wind, and temperature extremes you’ll likely encounter.
Verify manufacturer volume claims by packing systematically. A 50-liter pack might actually hold 45 liters when packed realistically. Check zippers, buckles, and seams under stress.
Wash gear according to care instructions to assess gear longevity before depending on it. Document what works and fails. This methodical approach prevents equipment failures when you’re alone miles from civilization.
Pay special attention to testing water-resistant materials like rip-stop nylon and weather-guarded zippers, as these features will be critical for protecting your gear during unexpected weather conditions.
Weight and Packing
The weight you carry determines whether your solo adventure becomes an enjoyable challenge or a grueling ordeal that cuts your trip short.
Your pack shouldn’t exceed 20% of your body weight for multi-day trips-that’s 30 pounds for a 150-pound hiker. Weight management starts with targeting a 10-20 pound base weight before adding consumables.
Effective pack organization follows specific principles:
- Position heavy items close to your back for stability and reduced strain
- Place lighter gear higher in the pack to maintain proper balance
- Store frequently used items in outer pockets for quick access
- Distribute weight evenly using hip belts and shoulder straps
Your total pack weight includes base weight plus food, water, and fuel.
Minimize base weight through lightweight gear selection, then add consumables based on trip duration and resupply availability. Choose ultralight water filters like the Sawyer Squeeze at 2 ounces or Katadyn BeFree at 2.3 ounces to significantly reduce your carried weight while maintaining reliable water purification.
Packing Strategies for Solo Adventures
Five critical packing decisions will determine whether your solo backpacking adventure becomes an empowering journey or a grueling ordeal. Your packing techniques must prioritize accessibility and weight management.
Place heavy items against your back’s center, positioning them between your shoulder blades and mid-back. This load distribution creates ideal stability when maneuvering uneven terrain alone.
Heavy gear belongs at your back’s center-between shoulder blades and mid-back-for optimal stability on challenging solo terrain.
Keep your pack weight between 20-25% of your body weight. A 150-pound hiker shouldn’t exceed 30-37 pounds total. Use compression sacks for sleeping bags and clothing to maximize space efficiency.
Pack frequently needed items-snacks, map, first aid kit-in external pockets or pack lid compartments.
Organize gear using packing cubes to prevent the frustrating excavation process when you need specific items quickly on the trail.
Choose a sleeping pad with 4-5 inches of thickness to ensure proper comfort and support during your solo nights in the wilderness.
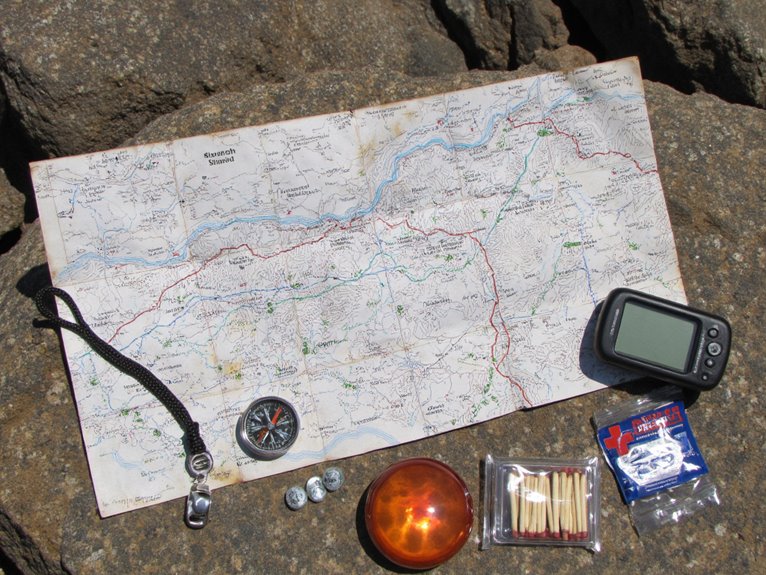
Smart packing won’t save you if you can’t find your way back to civilization. Solo backpacking demands proficiency with navigational tools including paper topographic maps, compass, and GPS devices.
Paper maps remain essential since GPS signals weaken in dense forests and canyons.
Master these core navigation skills:
- Terrain reading – Interpret ridgelines, valleys, and natural barriers to plot feasible routes.
- Route planning – Identify handrails like creeks and backstops like ridges for reference points.
- Cross-checking – Regularly verify visible landmarks against map features to catch errors early.
- Emergency communication – Carry satellite communicators like Garmin inReach for areas without cellular coverage.
Modern GPS devices with multi-GNSS support provide positioning accuracy under five feet and can operate for 12-25 hours depending on the model and usage patterns.
Obtain wilderness first aid certification before departing.
Practice off-trail navigation in various terrains to build competence.
Share detailed itineraries with trusted contacts for emergency response coordination.
Leave No Trace Principles and Wildlife Safety
Your solo backpacking experience depends on following Leave No Trace principles that protect wilderness areas for future visitors.
You’ll need to pack out every piece of trash including food scraps and toilet paper, maintain at least 25 yards from most wildlife and 100 yards from bears and wolves, and camp only in designated areas or on durable surfaces like established sites, rock, or gravel.
Quality sleep is crucial for maintaining energy and safety during solo trips, so invest in a sleeping pad with proper insulation properties and an R-value of 4.0 or higher to ensure comfort during temperature drops.
These practices guarantee your safety while preserving the natural environment that makes backpacking rewarding.
Pack Out All Trash
One of the most fundamental responsibilities you’ll carry as a solo backpacker is ensuring every piece of trash leaves the wilderness with you.
This includes all biodegradable items like food scraps, which disrupt natural nutrient cycles and attract wildlife. Proper trash storage prevents dangerous human-wildlife encounters and protects ecosystem balance.
Essential pack-out requirements:
- Carry a durable, sealable bag specifically designated for all waste materials during your expedition.
- Repackage food beforehand into minimal-waste containers to reduce total trash volume.
- Dispose of human waste in catholes 6-8 inches deep, 200 feet from water sources.
- Avoid chemicals near water to prevent contamination of aquatic ecosystems.
Biodegradable disposal outside designated areas can introduce invasive species and alter soil composition.
Your diligent waste management directly supports sustainable wilderness access. When planning your solo trek, consider investing in a reliable water filtration system to reduce single-use bottle waste while ensuring safe hydration throughout your journey.
Maintain Wildlife Distance
While wildlife encounters account for only 0.01% of hiking-related deaths, maintaining proper distance from animals remains critical for both your safety and their well-being.
National parks typically require 100 yards minimum distance from bears and other large wildlife. Use binoculars or zoom lenses for wildlife observation instead of approaching closely.
Never feed animals or attempt interaction. This disrupts natural animal behavior and creates dangerous habituation to humans.
Recognize signs of stressed or diseased wildlife, such as bears with mange, and avoid all contact. Keep noise minimal and pets leashed to prevent disturbing animals.
When encountering wildlife, remain calm and slowly back away while facing the animal. Avoid direct eye contact, which animals may perceive as aggression.
Carry bear spray in bear country and know proper usage techniques.
Camp Designated Areas Only
When selecting camping locations, federal and state regulations prohibit camping within 150 feet of roads, trails, springs, streams, ponds, or other water bodies unless you’re at designated sites marked by official signs or disks.
These restrictions minimize environmental impact and protect delicate ecosystems in wilderness areas.
Designated sites require specific compliance protocols:
- Secure all food and scented items in provided bear-proof containers or lockers to prevent wildlife attraction
- Pack out all trash and waste or use designated disposal facilities according to site regulations
- Keep fires contained to established fire rings where permitted; many areas prohibit open flames entirely
- Camp on durable surfaces like established tent pads, rock, or sand to reduce soil and vegetation damage
Permits often mandate designated sites only, with violations resulting in fines or permit revocation.
Final Preparations and Day-of-Departure Checklist
Since your backpack is loaded and your route is mapped, the final 24-48 hours before departure require systematic attention to crucial details that can make or break your solo adventure.
Complete final route confirmations by downloading offline maps and checking weather forecasts while you still have cell service. Load GPX files onto your GPS device and verify all waypoints match your planned campsites. Your checklist reminders should include charging all electronic devices to 100% capacity and inserting fresh batteries into backup headlamps.
Conduct a complete gear inventory using your master checklist. Verify permits, park passes, and identification are easily accessible in your pack’s top pocket. Double-check that your water filtration system is packed and functioning properly, as access to safe drinking water is critical for solo backpackers.
Arrange home security measures including mail holds and plant care. Activate emergency contact protocols and confirm your satellite communicator functions properly before leaving civilization.
Frequently Asked Questions
What Should I Do if I Feel Overwhelmed or Panicked While Alone?
When you’re overwhelmed alone, implement immediate coping strategies to regain control. Execute controlled breathing exercises: inhale for four counts, hold for four, exhale for six. Use grounding techniques by identifying five visible objects, four textures, three sounds. Find secure shelter immediately-park benches, cafés, or trail rest areas. Maintain hydration and consume light snacks to stabilize blood sugar. Establish emotional support through check-in messages with trusted contacts or emergency services if needed.
How Do I Handle Bathroom Needs and Hygiene During Solo Trips?
You’ll need portable toilets like WAG bags for areas prohibiting waste burial. Pack hygiene kits containing biodegradable soap, hand sanitizer, toilet paper, and a lightweight trowel. Dig catholes 6-8 inches deep, located 200 feet from water sources. Use the Leave No Trace principle: pack out all waste when required. Maintain hand hygiene with alcohol-based sanitizer after each use.
Is It Safe for Women to Backpack Alone in Remote Areas?
Solo safety for women in remote areas shows lower violent crime rates than urban environments. Female soloism faces minimal violent crime risk, with natural hazards causing most trail fatalities regardless of gender. You’ll encounter more non-violent harassment than actual danger. Safety concerns discourage 65% of women from solo travel, though experience reduces perceived risk from 78% to 59% after ten trips.
What’s the Best Way to Store Food to Prevent Animal Encounters?
You’ll need three primary storage methods depending on your location. Bear canisters work best in areas with sparse trees – they’re IGBC-certified and grizzly-resistant. Food bags require hanging 10 feet high and 10 feet from tree trunks using sturdy branches. Bear boxes are mandatory in developed campgrounds. Always store containers 100 feet from camp on level ground. Remove original packaging to reduce odors and space.
How Much Should I Budget for My First Solo Backpacking Trip?
You’ll need approximately $62 daily for accommodation, food, transportation, and activities. Budget $15,000-$18,000 for a 10-month trip, with flights alone costing $4,000+. Important budget tips include booking cheapest hostel beds, eating local street food, and limiting flights for overland transport. Use expense tracking apps to monitor spending closely-solo travelers can’t split fixed costs like accommodation, making careful financial monitoring essential for staying within limits.
On a final note
You’ve completed the essential groundwork for your solo backpacking adventure. Your trail selection matches your skill level. You’ve tested every piece of gear and verified its performance specifications. Your safety protocols are established and communicated to emergency contacts. Physical conditioning and navigation skills are developed. You understand Leave No Trace principles and wildlife protocols. Execute your final equipment check, confirm weather conditions, and begin your carefully planned journey with confidence.