River Crossing Techniques: When Bridges Are Out
When bridges are out, you’ll need proven river crossing techniques to navigate safely. First, evaluate water conditions by measuring current speed-if a floating object takes over 20 seconds to travel 100 feet, currents are under 5 feet per second and manageable. Look for straight river sections with shallow entry and exit points while avoiding submerged obstacles. Use the side-shuffle technique for solo crossings, facing directly into the current with feet shoulder-width apart. For groups, employ line astern formation or V-shaped wedges depending on team size. Always carry trekking poles for the tripod method, maintaining two points of contact while probing depth changes ahead. The techniques below will guarantee your crossing succeeds.
We are supported by our audience. When you purchase through links on our site, we may earn an affiliate commission, at no extra cost for you. Learn more. Last update on 16th January 2026 / Images from Amazon Product Advertising API.
Notable Insights
- Evaluate water conditions by measuring current speed, depth, and identifying downstream hazards before attempting any crossing.
- Choose straight river sections with shallow banks and natural barriers like islands that create slower, predictable currents.
- Use appropriate group formations: line astern for 2-4 people, human tripod for three, V-shaped wedge for five or more.
- Employ side-shuffle technique for solo crossings, facing upstream with trekking poles maintaining three-point contact for stability.
- Establish emergency protocols with communication devices, rescue plans, and predetermined abort criteria before entering water.
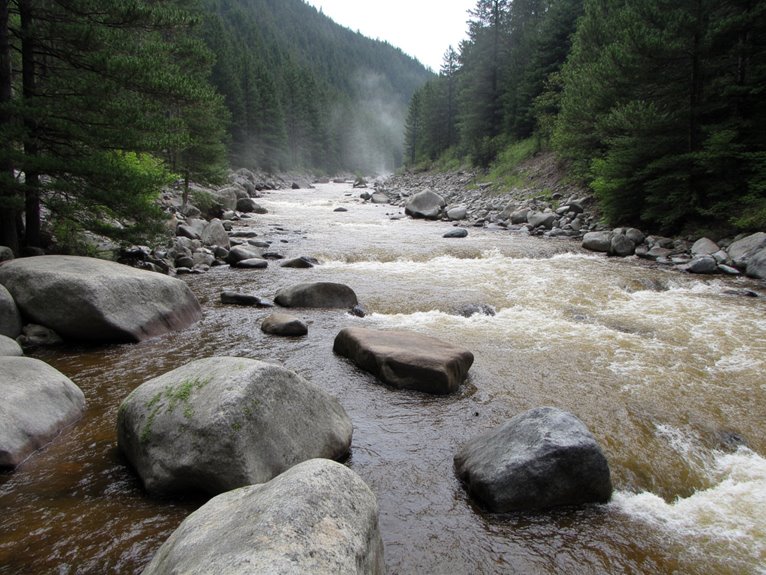
Evaluating River Conditions Before You Cross
Before attempting any river crossing, you must conduct a thorough evaluation of water conditions to guarantee safety and success. Start your risk assessment by measuring current speed using a floating object over a 100-foot path. Times exceeding 20 seconds indicate currents under 5 feet per second, which are safer for crossing techniques. Moving water’s force increases with velocity squared, making fast currents exponentially dangerous.
Check water depth using a stick or gauge, ensuring the person measuring wears a life vest and safety rope. Identify downstream hazards like rapids, strainers, and debris that could trap you. Weather conditions dramatically affect water levels-storms and thaws can transform previously safe crossings into deadly traps.
Visual indicators such as moving rocks signal dangerous flood conditions requiring alternative routes.
Finding the Perfect Crossing Spot
After completing your risk assessment, you’ll need to identify the perfect location for your crossing attempt. Effective crossing techniques depend heavily on current evaluation and terrain analysis. Look for uniform riverbeds with consistent depth patterns. Wider sections typically offer shallower water and reduced flow velocity.
Key factors for ideal crossing spot selection:
- Straight river sections – These areas maintain slower, more predictable currents compared to bend zones.
- Natural barriers – Islands and sandbars divide water flow into manageable channels.
- Shallow exit points – Verify both entry and exit banks provide stable footing.
- Minimal obstacles – Avoid areas with submerged rocks, logs, or dense vegetation.
Scout multiple angles upstream and downstream. Straight sections between bends offer the safest crossing conditions with reduced current speed and depth variation.
Essential Pre-Crossing Safety Preparations
Before you take your first step into flowing water, you must complete three critical safety preparations that can mean the difference between a successful crossing and a dangerous situation.
Your assessment should begin with evaluating current weather patterns, water depth measurements using trekking poles, and identifying downstream hazards within a 100-meter radius of your chosen crossing point.
Once you’ve gathered this data, conduct a thorough group briefing that covers formation positioning, emergency signals, and specific roles for each team member during the crossing sequence.
Weather and Conditions Assessment
When you’re standing at a river’s edge, the water conditions you see today won’t necessarily match what you’ll find tomorrow-or even an hour from now.
Weather patterns directly influence water levels, current strength, and overall crossing safety. Rivers rise dramatically during storms or winter thaws, transforming previously safe crossings into deadly traps.
Your assessment must account for these critical factors:
- Current Speed Measurement – Use the float method to gauge water velocity
- Downstream River Hazards – Identify waterfalls, rapids, and strainers within 100 yards
- Water Level Indicators – Check for debris lines showing recent flood stages
- Environmental Change Signals – Monitor weather conditions and flow variations
Evaluate current strength by timing floating objects across measured distances.
Strong currents create audible rock movement downstream, indicating dangerous conditions that require alternative crossing strategies.
Route Planning Strategies
Your next move determines whether you’ll cross safely or face life-threatening conditions downstream. Effective crossing strategies begin with systematic scouting upstream and downstream from visible trail crossings. You’ll need extensive risk assessment protocols that evaluate multiple factors simultaneously.
Select straight river stretches over bends to avoid deep pools and undercut banks. Target islands or sandbars that divide current flow, creating manageable crossing segments with rest points. Choose the widest, slowest-flowing channels available-dispersed water means reduced current speed and shallower depths.
Coordinate group logistics before entering water. Establish rescue plans and designated take-out points for emergencies. Cross as teams rather than solo; partner systems provide critical safety redundancy.
Match your selected crossing site to group fitness levels, experience, and available equipment. Allocate sufficient time for thorough site evaluation. Pack an extra pair of moisture-wicking socks in a waterproof bag to change into immediately after crossing, as wet feet increase blister risk and reduce comfort during continued hiking.
Group Safety Briefings
Although crossing preparation extends beyond route selection, the safety briefing represents your final checkpoint before committing to water entry.
You’ll establish clear group roles and communication strategies that could save lives. The strongest member moves upstream to break current flow. Weaker swimmers position downstream for protection.
Essential briefing components include:
- Emergency signals – Hand gestures for “stop,” “help,” and “abort crossing”
- Recovery positions – Float on back, feet downstream if swept away
- Contact maintenance – Two points of riverbed contact at all times
- Exit strategies – Predetermined escape routes if conditions deteriorate
Assign one person as safety observer who stays dry and monitors from shore. They’ll coordinate rescue efforts if needed.
Don’t skip this briefing-it’s your insurance policy against disaster.
Solo Crossing: The Side-Shuffle Method
Solo river crossings demand precision and methodical execution, with the side-shuffle technique serving as your most reliable approach for traversing moving water safely. This solo technique requires understanding water dynamics and maintaining constant awareness of current patterns.
Position yourself facing directly into the current with feet shoulder-width apart. Remove backpack straps for quick release if swept downstream. Move your outer foot into the channel first, ensuring secure placement before transferring weight. Once stable, slide your inner foot toward the outer foot without crossing your legs.
Continue this shuffling progression across the river. Check depth with each step using a pole or careful probing. Cross at a shallow diagonal angle to reduce current power. Keep movements deliberate and slow.
Monitor changing water conditions continuously while maintaining your centered balance position. For emergency situations, carry 1000-pound paracord that can withstand extreme loads if you need to establish a hand line or emergency anchor point during particularly challenging crossings.
Using Poles and Staffs for Stability
Your choice of pole material directly impacts crossing safety-select sturdy, straight sticks or adjust trekking poles by removing baskets to reduce water drag and improve riverbed sensitivity.
Master the tripod technique by maintaining two points of contact at all times: plant your pole downstream while facing upstream, step laterally, then advance the pole in a controlled side-shuffle pattern.
Before committing your full weight to each step, probe the intended foot placement with your pole to detect depth changes, loose rocks, or hidden obstacles that could destabilize your crossing.
When river crossings are unavoidable, ensure your hiking footwear provides sticky trail outsole traction for better grip on wet, slippery rocks and riverbed surfaces.
Selecting Sturdy Pole Materials
Material selection forms the foundation of reliable river crossing equipment, determining whether your pole will provide dependable support or fail when you need it most.
Pole materials must meet strict durability standards to handle full body weight and resist current forces.
Carbon fiber delivers the best strength-to-weight ratio for demanding crossings. These poles withstand bending forces while remaining lightweight for extended use.
Aluminum offers reliable performance with 75% recycled content, providing excellent corrosion resistance in wet environments.
Essential Material Requirements:
- Load capacity – Must support complete body weight without flexing
- Water resistance – Prevents corrosion and material degradation
- Impact tolerance – Withstands strikes against rocks and debris
- Grip integrity – Maintains secure hold when wet
Avoid wooden poles unless carefully inspected for rot or weak grain patterns.
Proper Tripod Technique
The tripod technique transforms an unstable two-point stance into a rock-solid foundation that’ll keep you upright in challenging currents.
Form this stable system using two feet and one trekking pole, creating three solid contact points with the riverbed. The tripod advantages include dramatically improved balance and resistance against downstream forces.
Master proper pole positioning by planting your pole firmly upstream and slightly forward. The current will help secure it in place while you probe for hidden obstacles ahead.
Maintain at least two contact points before moving the third-never lift both feet simultaneously. Grip single poles with both hands for maximum control in swift water.
Remove pole baskets to reduce drag in fast currents.
Keep constant bottom contact for leverage and stability throughout your crossing.
Depth Probing Methods
Before committing your full weight to each step, you’ll need systematic depth assessment to identify safe crossing points and avoid potentially dangerous drop-offs or unstable footing.
Effective depth measurement techniques rely on probing devices like trekking poles or sturdy walking sticks approximately 2 meters long. Insert your pole vertically into the riverbed ahead of each step, testing for solid footing and measuring water depth.
Essential probing strategies include:
- Upstream pole positioning – Hold your staff on the upstream side, pressing firmly against the bottom.
- Three-point contact method – Maintain pole plus both feet contact for maximum stability.
- Audio depth testing – Toss rocks to hear “ka-thump” sounds indicating deeper water.
- Continuous bottom dragging – Keep pole in contact with riverbed rather than lifting between steps.
Group Crossing Formations and Strategies
When crossing rivers as a group, proper formation selection directly impacts your team’s safety and success rate in challenging water conditions.
Your river formations must match group size and water characteristics for maximum effectiveness. For two or four people, use line astern formation. Face upstream while linking arms or pack straps for mutual support.
Teams of three should employ the human tripod method, forming a triangle with arms locked over shoulders.
Groups of five or more require V-shaped wedge formation. Position your largest member at the front to break current flow.
These crossing techniques demand synchronized movement and careful positioning of weaker members in the middle.
Always face the current directly. Move laterally in slow, deliberate steps.
Strong currents require pole assistance for additional riverbed contact points and enhanced stability.
Safety Equipment and Gear Considerations
Effective team formations mean nothing if you’re not equipped with the right safety gear for water crossings. Your gear essentials determine survival margins when conditions deteriorate rapidly.
Essential equipment includes:
- Sturdy hiking boots – Aggressive tread patterns provide critical traction on slippery riverbeds.
- Trekking poles – Two poles offer superior stability in strong currents versus single-pole configurations.
- Emergency shelter – Space blankets or bivys protect against hypothermia if stranded.
- Waterproof communication devices – GPS units and phones in protective cases enable rescue coordination.
While flotation devices aren’t standard hiking gear, consider personal flotation devices for high-risk crossings.
Avoid cotton materials entirely-wool and synthetic fabrics maintain insulating properties when wet.
Pack spare dry clothing and quick-energy snacks. Your backup power sources extend device functionality during multi-day scenarios.
Managing Backpacks During River Crossings
Your backpack becomes both an asset and liability during river crossings, requiring specific adjustments to maximize safety and buoyancy potential.
You’ll need to unbuckle hip belts and sternum straps before entering the water, allowing quick pack removal if current conditions force you underwater or off balance.
Proper strap management and flotation techniques can transform your pack from a dangerous anchor into a supportive flotation device that aids rather than hinders your crossing.
Lightweight backpacks offer significant advantages during water crossings since they create less drag and are easier to manage if emergency pack removal becomes necessary.
Pack Flotation Safety
Proper pack management during river crossings can mean the difference between a controlled traverse and a life-threatening emergency.
Your backpack’s pack buoyancy comes from trapped air in compartments and gear, creating natural emergency flotation when properly configured. However, waterlogged packs become dangerous anchors that’ll drag you underwater.
Essential Pack Flotation Safety Steps:
- Partially unbuckle chest and waist straps for quick release if you’re swept downstream.
- Face upstream while crossing to maintain control and reduce drag impact on your pack.
- Use sealed dry bags inside to enhance buoyancy and prevent water absorption.
- Keep pack weight under 25% of body weight to avoid destabilization during submersion.
Position yourself for quick pack ditching. If swept away, flip onto your back immediately, letting the pack support you while swimming feet-first to safety.
Choose backpacks with water-resistant materials like rip-stop nylon and weather-guarded zippers to minimize water absorption during crossings.
Strap Adjustment Techniques
Modern backpack design has fundamentally shifted the traditional approach to strap adjustment during river crossings. You no longer need to loosen shoulder straps or unclip hipbelts and sternum straps as once recommended. Contemporary lightweight packs eliminate the drowning risk that heavier models posed.
Focus on strap tightening rather than loosening. Secure adjustments prevent your pack from shifting during crossings, maintaining your center of gravity. Modern pack security systems are engineered to work with your body, not against it.
If conditions seem dangerous enough to warrant strap loosening, you’re better off finding an alternative crossing point. Today’s streamlined pack designs won’t drag you underwater.
Channel your energy into selecting safer routes rather than preparing for potential falls through strap manipulation. Look for packs with adjustable hip straps and chest belts that ensure secure, bounce-free carrying even in challenging water crossing conditions.
Weather and Environmental Factors
Weather conditions can transform a simple river crossing into a life-threatening situation within hours, making environmental awareness your most critical safety tool.
Understanding river dynamics requires monitoring multiple factors that affect water behavior. Heavy rainfall increases discharge rates and water depth rapidly. Flash flooding can alter conditions within minutes, while seasonal wet periods saturate soils and elevate groundwater levels unexpectedly.
River conditions can shift from safe to deadly in mere minutes due to rainfall, flooding, and changing water levels upstream.
Effective flood awareness involves tracking these environmental indicators:
- Upstream weather patterns – Monitor forecasts for precipitation in the watershed above your crossing point
- River gauge data – Track real-time water levels and flow velocity measurements when available
- Seasonal variations – Account for snowmelt, wet seasons, and drought cycles affecting baseline flows
- Dam releases – Hydropeaking events cause sudden level changes without local weather triggers
Ice formation, wind-driven waves, and tidal influences near estuaries further complicate crossing safety assessments. In emergency crossing situations, emergency lighting from waterproof sources becomes essential for navigation and signaling during low-visibility conditions caused by storms or darkness.
Emergency Protocols and Risk Management
When river conditions deteriorate beyond acceptable safety margins, you’ll need immediate protocols that can save lives and prevent emergencies from escalating into tragedies.
Your emergency communication system must include satellite devices or emergency beacons for areas without cell coverage. Establish check-in times with trusted contacts before departure. If conditions become unsafe, activate your predetermined emergency plan immediately.
Rescue planning requires identifying downstream hazards and safe extraction points before crossing attempts. Scout multiple exit routes along the riverbank. Position rescue equipment strategically upstream from crossing points.
| Emergency Action | Required Response Time |
|---|---|
| Abort crossing decision | Immediate assessment |
| Activate emergency beacon | Within 5 minutes |
| Execute rescue protocol | 2-3 minutes maximum |
| Retreat to safety zone | Immediate movement |
Never hesitate to retreat when conditions exceed your group’s capabilities.
Frequently Asked Questions
How Often Should I Practice River Crossing Techniques Before Attempting Real Crossings?
Your practice frequency depends on your current skill level and experience.
Beginners need weekly sessions for several months before attempting real crossings. This builds essential muscle memory and decision-making speed.
Intermediate practitioners should maintain biweekly training schedules.
Advanced crossers require quarterly refreshers minimum.
Each session must include skill assessment through simulated conditions with variable currents and terrain.
You’ll need consistent practice to master water reading, equipment use, and self-rescue techniques safely.
What’s the Maximum Safe Water Temperature for Extended River Crossing Attempts?
For extended river crossing attempts, you shouldn’t exceed 65°F (18°C) water temperature without significant hypothermia risk.
Water temperature below this threshold rapidly compromises your body’s ability to maintain core heat during prolonged exposure.
At 60-65°F, safe immersion times drop to 3-6 hours at waist depth. Crossing safety deteriorates quickly in water below 50°F, where cold shock occurs within minutes and motor function becomes severely impaired.
Are There Specific Clothing Materials That Perform Better During River Crossings?
You’ll want synthetic materials like polyester and nylon for ideal fabric durability and moisture wicking properties.
These fabrics dry quickly, reducing hypothermia risk. Merino wool maintains insulation when wet but dries slower.
Avoid cotton completely-it retains water, loses insulating properties, and increases cooling.
Synthetic layers offer stretch for mobility while wool provides backup warmth.
Choose quick-drying, non-restrictive garments that won’t compromise your safety.
How Do I Cross Rivers Safely While Carrying Injured Group Members?
You’ll need strong group members to form a human chain while managing injured teammates.
Position the strongest person upstream to break the water current’s force. Use rescue equipment like ropes or trekking poles for additional stability.
Create a triangle formation with the injured member in the protected center position. Move slowly and deliberately, maintaining constant communication.
Never attempt crossing if the current exceeds knee-deep or moves faster than walking speed.
What Legal Permissions Are Needed for Crossing Rivers on Private Property?
You must obtain landowner permission before crossing private property to reach rivers.
Property rights allow owners to restrict access, even to navigable waters. You can’t legally trespass to gain water access without explicit consent or established easements.
Entry requires using designated public access points only. State laws vary greatly regarding riparian access rights.
Always verify local regulations and secure written permission when crossing private land to avoid trespassing violations.
On a final note
You’ve learned the fundamental techniques for safe river crossing when bridges aren’t available. Apply the side-shuffle method with proper pole positioning. Check water depth, current speed, and bottom conditions before entering. Secure your gear and maintain three points of contact. Don’t attempt crossings in water above mid-thigh or current speeds exceeding 1.5 mph. Turn back immediately if conditions worsen. Your safety depends on careful preparation and conservative decision-making.