How to Patch and Repair Sleeping Pads in the Field
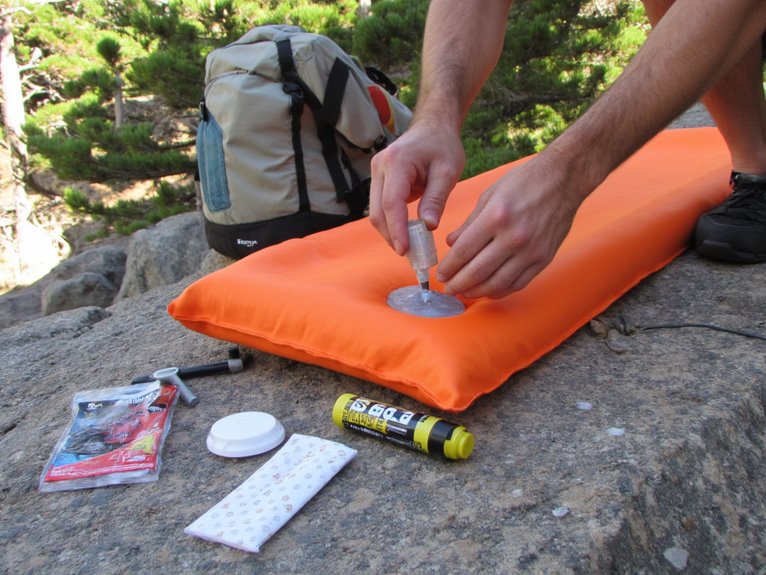
To patch a sleeping pad in the field, you’ll first locate the leak using soapy water to spot bubbles forming at puncture sites. Clean the damaged area thoroughly with alcohol wipes, then apply a fabric patch from your repair kit using outdoor-specific adhesives like Gear Aid Seam Grip or Aquaseal FD. Press firmly for 30 seconds, working from center outward to eliminate air bubbles. Allow 24-hour cure time before full inflation for maximum durability and waterproof performance in backcountry conditions.
We are supported by our audience. When you purchase through links on our site, we may earn an affiliate commission, at no extra cost for you. Learn more. Last update on 17th January 2026 / Images from Amazon Product Advertising API.
Notable Insights
- Carry a lightweight repair kit containing outdoor adhesives, fabric patches, scissors, and alcohol wipes in your sleeping pad’s stuff sack.
- Locate leaks by fully inflating the pad and using soapy water to identify bubble formation at failure points.
- Clean the damaged area thoroughly with alcohol wipes and allow to dry completely before applying any patches or adhesive.
- Press patches firmly for 30 seconds, working from center outward to eliminate air bubbles and ensure complete edge adhesion.
- Allow 24-hour cure time before inflating and regularly inspect patched areas to maintain long-lasting repairs during future trips.
Essential Tools and Materials for Quick Fixes
When your sleeping pad develops a puncture in the backcountry, you’ll need the right tools and materials to execute an effective repair.
Essential repair materials include outdoor-specific adhesives like Gear Aid Seam Grip WP or Aquaseal FD, both providing waterproof, flexible bonds. Your kit should contain fabric patches-typically two-inch squares made from lightweight, durable materials like Tenacious Tape.
Quality adhesives and durable fabric patches form the foundation of any reliable backcountry sleeping pad repair kit.
Field readiness requires additional tools: sandpaper for surface preparation, scissors for cutting patches to size, and alcohol wipes for cleaning the repair area.
Pack these items in a compact repair kit weighing under two ounces. Commercial options from Therm-a-Rest, ALPS Mountaineering, and Gear Aid start under $10 and include detailed instructions for best results.
For optimal accessibility during emergencies, store your repair kit compactly in your sleeping pad’s stuff sack rather than buried deep in your backpack.
Locating Air Leaks and Damage
Before attempting any repair, you must accurately identify the exact location of air leaks in your sleeping pad. Proper leak detection requires systematic pressure testing and careful inspection.
Fully inflate your pad to maximum capacity. This increased air pressure makes even minor leaks detectable through audible hissing or tactile air movement. Focus on valve gaskets, seams, and previously patched areas-these locations fail most frequently.
Apply soapy water solution using a spray bottle or brush across suspected leak points. Watch for bubble formation, which confirms air escape routes. Mark each leak location immediately.
| Detection Method | Success Rate | Time Required |
|---|---|---|
| Visual inspection | 40% | 2-3 minutes |
| Soapy water test | 95% | 5-7 minutes |
| Water immersion | 99% | 8-10 minutes |
For persistent leaks, submerge sections in water while applying gentle pressure to force microscopic punctures. Professional tub test method provides the most thorough leak detection when partial immersion fails to identify damage sources.
Cleaning and Preparing the Repair Surface
Before applying any patch, you must thoroughly clean the damaged area to guarantee proper adhesion.
Remove all dirt, debris, and oils using rubbing alcohol and a soft cloth, as contaminants will prevent the patch from bonding correctly to the pad’s surface.
Once cleaned, allow the surface to dry completely in warm conditions before proceeding with the repair.
Remove Dirt and Debris
Proper surface preparation determines whether your patch will hold for years or fail during your next camping trip. Effective cleaning techniques require systematic dirt removal before applying any repair materials. Start with clean water and a cloth to remove loose debris from the damaged area.
For stubborn contamination, these surface preparation methods guarantee ideal adhesion:
- Apply rubbing alcohol – Dissolves oils and grime that water can’t remove
- Use soft sponges only – Coarse surfaces create micro-scratches that weaken adhesion
- Choose mild detergent – Washing-up liquid without bleach removes persistent stains safely
- Deploy soft brushes – Undamaged bristles clean textured surfaces without gouging material
Avoid harsh chemicals, bleach-containing products, and abrasive materials. These compromise the pad’s integrity and prevent proper patch bonding.
Clean surfaces create chemical bonds between adhesive and material.
Dry Surface Completely
After cleaning removes all dirt and debris, you must eliminate every trace of moisture before applying any adhesive or patch material. Residual moisture will cause repair failure by preventing proper adhesion between the patch and pad surface.
Effective moisture management requires specific drying techniques based on your environment. Elevate or hang your pad rather than placing it on damp ground. Use alcohol-based cleaners for faster evaporation compared to water-based alternatives.
| Environment | Drying Method | Time Required | Tools Needed | Success Rate |
|---|---|---|---|---|
| Dry/Warm | Air drying | 5-10 minutes | Clean cloth | 95% |
| Humid | Blot + air dry | 15-20 minutes | Absorbent towel | 90% |
| Cold | Extended air dry | 20-30 minutes | Dry cloth | 85% |
| Windy | Elevated drying | 3-7 minutes | Hanging system | 98% |
| Field conditions | Alcohol wipes | 2-5 minutes | Sanitized wipes | 92% |
Proper Patch Application Techniques
Follow this systematic approach:
- Press firmly for 30 seconds – Your repair’s success depends on initial contact pressure.
- Apply steady downward force – Eliminate air bubbles that compromise seal integrity.
- Work from center outward – This technique prevents wrinkles and guarantees complete adhesion.
- Check edge security – Loose perimeters lead to catastrophic failure during inflation.
Allow 24-hour cure time before inflating.
Temperature affects curing speed – cold conditions require extended drying periods for peak bond strength.
After the repair cures, maintain proper valve maintenance by regularly inspecting mechanisms and seals to ensure your pad’s long-term performance.
Field Repair Kit Options and Backup Solutions
You’ll need reliable repair materials when your sleeping pad fails in the backcountry, whether that’s a commercial kit or improvised alternatives.
Most manufacturers include basic patch kits with their pads, but these often contain minimal materials like two 2-inch square patches and adhesive stored in your stuff sack.
Smart backpackers also carry backup solutions such as multipurpose repair tape, alcohol wipes for surface prep, and even a lightweight spare pad for critical failures.
Commercial Repair Kit Contents
Most commercial sleeping pad repair kits contain three essential components: self-adhesive patches for immediate field repairs, cleaning materials to prepare surfaces, and specialized adhesives that vary by manufacturer and intended use.
You’ll find alcohol wipes or rubbing alcohol in standard kits for surface preparation. Tools like mini scissors guarantee precision cuts, while some kits include UV lights for specialized applications.
Commercial patch types range from lightweight glue dots to durable TPU film patches. Adhesive durability varies greatly between options. Self-adhesive patches offer instant application but moderate longevity. Wet adhesives like Seam Grip require hours to cure but provide superior strength.
Key components that’ll save your trip:
- Self-adhesive patches – Your lifeline when punctures threaten sleep
- Cleaning alcohol – The difference between success and failure
- Valve components – Emergency backup for catastrophic failures
- Multiple patch sizes – Versatility when damage varies
DIY Alternative Solutions
When commercial repair kits aren’t available, resourceful backpackers can assemble effective DIY alternatives using common gear and improvised materials.
Gear Aid Aqua Seal UV and Shoe Goo serve as proven flexible adhesives for durable field repairs. Super glue works for small punctures but degrades with repeated flexion.
Tenacious Tape and bicycle inner tube patches provide reliable patch materials when cut to size. First aid supplies double as repair resources-alcohol wipes clean surfaces effectively, while adhesive bandages can substitute for patches.
Duct tape offers temporary solutions for small tears. Fine sandpaper improves adhesion, and markers help identify leak locations.
You’ll detect leaks using soapy water for bubbling or submerging pads in available water sources.
Emergency Backup Methods
While DIY solutions provide workable fixes, dedicated field repair kits offer superior reliability and performance for critical backcountry situations. These commercial kits contain purpose-built patch materials and adhesives engineered specifically for sleeping pad fabrics.
Therm-a-Rest Instant Field Repair Kits feature self-adhesive patches that bond immediately without curing time. GEAR AID Seam Grip WP provides waterproof sealant that works across multiple fabric types, while Tenacious Tape offers versatile backup coverage.
Essential emergency repair techniques include:
- Pre-cleaning damaged areas with alcohol wipes before patch application
- Cutting patches 25% larger than the hole for ideal seal coverage
- Applying firm pressure for 60 seconds to guarantee proper adhesion
- Creating redundant seals by combining patches with sealant for maximum durability
Best Practices for Lasting Emergency Repairs
Although field conditions often prevent ideal repair scenarios, you can still achieve durable patches that’ll last for years with proper technique and materials. Effective adhesive choices like Seam Grip provide superior bonding strength compared to temporary alternatives.
Proper technique and quality materials like Seam Grip enable field repairs that endure for years despite challenging conditions.
Apply adhesive sparingly to both the patch and pad surface for maximum adhesion. Patch material selection greatly impacts repair longevity. Tenacious Tape offers excellent durability, while precut patches from manufacturer repair kits guarantee proper material compatibility.
Clean the repair area thoroughly with rubbing alcohol before application. Remove all dirt, oils, and moisture that could compromise bond strength. Allow minimum curing time of several hours when possible. Overnight curing dramatically enhances adhesive performance.
Test repairs by inflating the pad fully before depending on it for sleep.